Getting Started
The first thing to do after downloading the retinotopic mapping module is to set up a monitor to display some stimulus routines. Ideally you should have two monitors, one for running your python scripts and another for displaying stimulus. This will allow you to get familiar with the code base in a simple and straightforward manner, as well as get some practice in debugging your experimental setup.
After working through this tutorial you should be able to display simple stimulus routines, and be familiar enough with the basic functionality of the experimental part of the code base to debug your own python scripts.
Setting up your monitor
The MonitorSetup module is used to store and keep track of all
your experimental display monitor specs as well as the geometry of the experiment.
There are two classes within the module: Monitor
and Indicator. For now we won’t pay much attention
to the Indicator class, except to mention that it is
used for timing purposes.
Instead we will focus on the Monitor class, what it
does and how it works. But first, here is a visualization of the experimental setup
to get an idea of what kind of geometerical parameters are stored in the object.
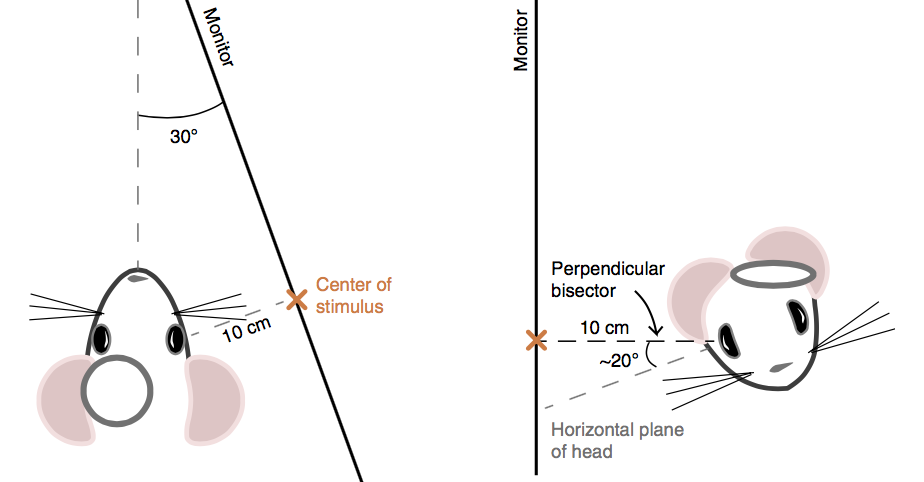
Image taken from (2) in Citations.
The specs you will need to initialize a monitor object are as follows:
- Monitor resolution (in pixels).
- Monitor refresh rate (in Hz).
- Monitor width/height (in cm).
- Distance from the mouse’s eyeball to the monitor (in cm).
- Distance from the mouse’s gaze center to the top of the monitor (in cm).
- Distance from the mouse’s gaze center to the anterior edge of the monitor (in cm).
- Angle between the mouse’s body axis and the plane that the monitor lies in (in deg).
It’s not important that you know the exact parameters right away but you should definitely check to see if you are able to display stimulus. Since this is a package to both analyze and display experimental results, it is important that you are able to play around with all of the parameters that define the visual stimuli. That way you will have significant freedom and creativity in customizing your own routines.
Testing your display setup
Since we are just interested in trying to display some stimulus quickly, don’t worry too much about having exact numbers for all of these parameters. It turns out that PsychoPy will automatically resize your display monitor to fit the screen if you put in the wrong parameters. So just put something in and try to make sure everything works on your machine before going any further.
Let’s assume we have a monitor with resolution 1080x1920, refresh rate of 60Hz, and height and width of 90 and 50 cm respectively. Neglect the geometry of the experimental setup for now unless you already know your exact parameters.
Then under these assumptions we can initialize
Monitor and Indicator objects
as follows:
>>> from MonitorSetup import Monitor, Indicator
>>> mon = Monitor(resolution=(1080,1920),
                  refresh_rate=60.,
                  mon_width_cm=90.,
                  mon_height_cm=50.,
                  dis=20,
                  mon_tilt=10.
                  C2T_cm=30.
                  C2A_cm=40.)
>>> ind = Indicator(mon)
Displaying Stimulus
Now we are ready to display a stimulus routine on your monitor
from the DisplaySequence class. There are several
routines to choose from the Stimulus module
(each of which can be previewed here), but
for this example we will initialize the FlashingCircle
routine which takes the mon and ind variables
as parameters.
>>> import StimulusRoutines as stim
>>> from DisplayStimulus import DisplaySequence
>>> flashing_circle = stim.FlashingCircle(mon,ind)
>>> ds = DisplaySequence(log_dir='log_directory')
>>> ds.trigger_display()
which will give an output that should look something like this

Note
If you are having trouble with setting up your display monitor
try experimenting with the for_debugging.py script found
in the primary module folder. This script can be used to display
template routines and debug your setup to get up and running.